Tag Archives: Disney

20 Comments

This week I completed and sent my mini quilt for my 2nd Instagram swap. I was assigned Megan in the Disney Mini Swap 2015 and she had great info to go on in her questionnaire. I've enjoyed stalking her on IG and it was fun when she started following me. I couldn't post any real clear pictures of what I had planned for the mini since I thought it would give it away. I'm excited to be able to share it now. Since her Disney likes were diverse I had quite a few good options. I was drawn to the mention that she and her husband got engaged on Pirates of the Caribbean. I'd really love to hear the details on that story, and I thought a quilt about Pirates would be fun. I put the idea in my top 3 and started looking for visual inspiration. I was looking at the minimalist Disney posters and I ran across this one.

from http://thedisneyblog.com

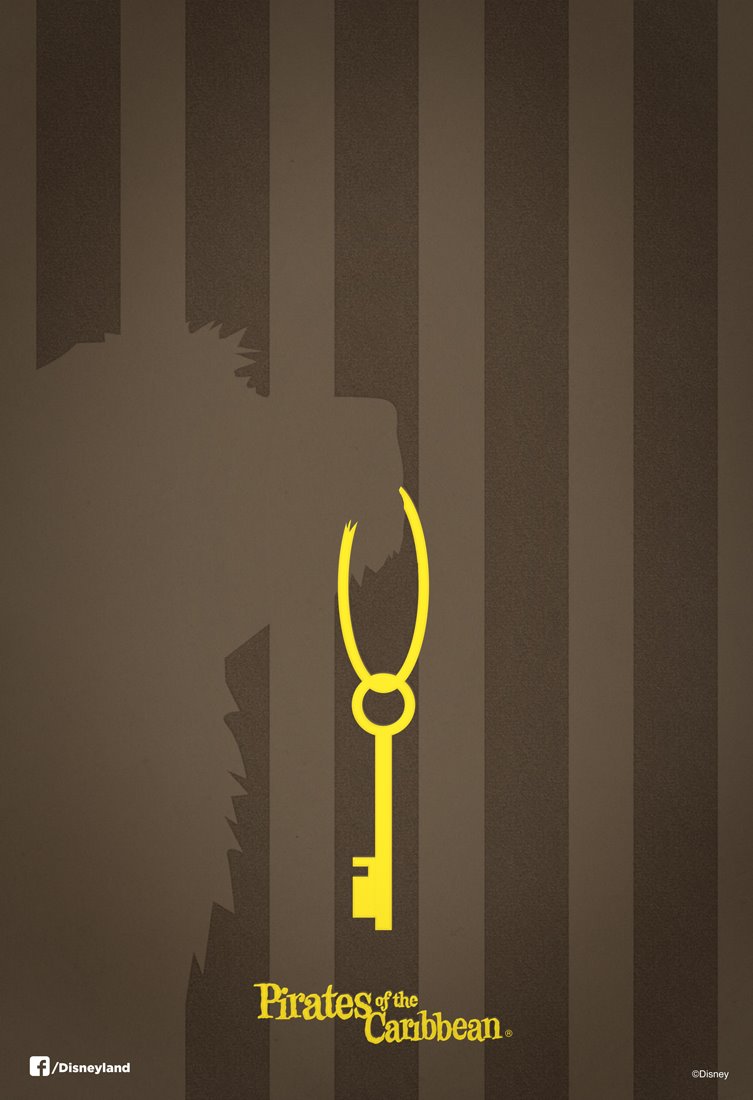
I decided this was it! But like me, Megan doesn't like muddy colors and I didn't want to do a quilt that was 99% brown. So, I decided to work in a palette of "bright and happy fabrics" with polka dots, and using blues and/or greens (her favorite colors). I kept bouncing my ideas off my sister and a friend to make sure that I wasn't too crazy. The group of us decided it was just crazy enough and I plugged along, hoping Megan would love it. I altered the keyring to have a heart as a symbol of their engagement. I really had a great time making this quilt. Thanks for all the inspiration, Megan!

It is, indeed, minimalist in nature. The background is pieced strips and there are two pieces appliqued on top. I used raw edge applique since it's a mini/wall hanging. It was awesome how fast that process is compared to turned edge applique. I quilted in the ditch on the background (using free motion quilting) and around the edges of the appliqued pieces. The quilt measures about 13" by 18".

I made a quick trip to the copy shop to enlarge my dog pattern to legal sized.
I altered the key ring to make it heart shaped after it was enlarged.
The finished mini: 13" x 18"

I'm linking up on Needle & Thread Thursday, Finish It Up Friday, TGIFF and Fabric Frenzy Friday.

This is one of my finishes from my Q1 Finish Along Goal List. Linking up to the Q1 Finishes party at On the Windy Side.

30 Comments

(P.S. Make it in white as an Elsa hair braid.)

In January, I started the process of helping my friend Monica prepare for her daughter's 4th birthday party that was a month out at the time. The theme was Tangled. I did my due diligence and watched the movie the weekend before.

Rapunzel

The first project was to make Rapunzel hair for the girls (and my son, the only boy attending the party).

bright yellow yarn nothing fancySo armed with three large skeins of bright yellow yarn we got to work. Taking measurements on The Boy, we decided to go with seven-foot lengths, aiming to have a two foot braid in the back. After making the prototype we realized that braiding shrunk the length more than we anticipated. In round two we cut nine-foot lengths. It's also important not to stretch the yarn taut as you measure or it shrinks back up after cutting.

For the 4-year-olds we decided that 20 inches around their head was a good length. It has a little give if they are bigger and can be tied if need be to shorten up that part.

HOW TO MAKE YOUR OWN RAPUNZEL HALO BRAID

MATERIALS

  • scissors
  • tape measure
  • yarn

For Rapunzel braids, use bright yellow.

To make 2 braids: Red Heart Super Saver Yarn, Bright Yellow, 364 yards
To make 4 braids: Red Heart Super Saver Jumbo Yarn, Bright Yellow, 744 yards
To make 6 braids: Bulk Buy: Red Heart Super Saver Yarn (3-Pack) Bright Yellow, 1092 yards total

For Elsa braids, use soft white.

To make 2 braids: Red Heart Super Saver Yarn, Soft White, 364 yards
To make 4 braids: Red Heart Super Saver Jumbo Yarn, Soft White, 744 yards
To make 6 braids: Bulk Buy: Red Heart Super Saver Yarn (3-Pack) Soft White, 1092 yards total

sixty 9 foot pieces of yarnStep 1: Cut sixty pieces of yarn, each 9 feet (108 inches) long.  Put them in one stack and find the center (4.5 feet from the end).

Step 2: Measure about 15 inches from the center of the lengths and temporarily tie off the yarn with a small piece of yarn.

step 3Step 3: Split the yarn into three sections and braid toward the center point until you have 20 inches of braid. Tie off the end of the braided section. (If you notice that the two unbraided ends aren't the same length, then you can untie one tie to braid further in that direction so this 20-inch section is roughly in the middle.)

step 4Step 4: Leaving the temporary ties at the ends of the middle braided section, make a loop with the braided part and join the two ends of the yarn to braid down in one fat braid.

Step 5: Tie off the end of the braid and trim up the loose ends if needed.

step 6Step 6: Untie the temporary ties that originally held the ends of the center section of braid. Tie around the top of the large braided section.  This tie can be adjusted to change the length of the part that goes around the head.  It's also kinda stretchy.

Tada!

wearing_the_braid

wearingthebraid

I LOVED all the details of the party.

The favors included the adorable satchels as well as the braids, which the kids got to decorate at the party.
Glittery, thick foam, flower stickers were available for braid decorating.
The cookies I made, the ADORABLE cake, braided rolls and another yarn braid as decor.