Tag Archives: quilt tutorial

2 Comments

Welcome to my stop on the Back to School Blog Hop for 2022! Now that my kids have been back in school for a few weeks, I've gotten back into the groove of getting into my studio more regularly. I've done some sewing, some tidying, some planning, and some writing. :-)

My newest class is Building an Improv Toolbox. (P.S. You can take it with me on November 5!) In improv I often don't concern myself with things lining up precisely, but even then, sometimes I do want it to happen. These tips are for those times... in addition to any precise piecing for patterns and traditional blocks.

First Tip - Press Seams Open

I like my seams pressed open for two reasons. The first is that I do a lot of my own quilting and really like how flat these seams lay when I'm doing free motion quilting on my domestic machine. Second, I find it really helps me with the precision! I've never had great luck with nested seams landing exactly where they should. This method helps me achieve perfect points when I want them.

Use a thin, high quality thread (my preference is Aurifil 50wt cotton thread for piecing) and reduce your stitch length a smidge for best results.


Second Tip - Use Pins

I don't use pins all the time, but when I want something to perfectly match up, I pull out the pins. I start by sticking one pin perpendicularly through the fabric -- right through the seam and 1/4" from the edge of the fabric. Then I go through the second layer of fabric with the same pin, stabbing through the seam 1/4" from the edge of the fabric. Obviously, we can't sew with a pin perpendicular to the fabric, so next I take two more pins and pin on either side of my guide pin. Then I remove that perpendicular guide pin and head to the machine.

Top view of pin through seams, 1/4 inch from the top edge.

Bottom view of pin through seams, 1/4 inch from the top edge.

Pin on either side of the seams.

Remove initial guide pin.

Final seam, pressed open and flat.


Third Tip - Just Sew a Little Bit

If that desired perfect point is in the middle of a long seam there is nothing worse than realizing it's a bit off and having to seam rip the entire seam. When these precise points fall in the middle of a long seam I just sew about an inch on either side of the point. With seams pressed open and pins as described above, I sew a couple inches including the point. Then I can take it to the ironing board and even temporarily press the seam as desired to get a good look at the precision. If I'm happy, I press the seams closed and return to my machine to sew the entire seam (right over my previous stitching for the test patch). If I'm unhappy with the precision then I only have a couple inches to rip out to try again.


Be sure to visit every stop on the hop!

Sept. 15 - Geeky Bobbin - Press for Success! - https://geekybobbin.com

Sept. 16 - Katie Mae Quilts - Storage Solutions From The School Supplies Section - https://katiemaequilts.com/blog

Sept. 17 - Quilting Jetgirl - Make A Design Wall You Can Use Your Hera Marker Against - https://quiltingjetgirl.com/

Sept. 18 - Karen Bolan - How to Get Perfect Tension - https://www.karenbolan.com

Sept. 19 - Devoted Quilter - How To Trim HSTs Without A Specialty Ruler - https://www.devotedquilter.com

Sept. 20 - Sarah Ruiz - Calculating Quilt Backing and Binding Fabric Requirements - https://saroy.net

Sept. 21 - Andy Knowlton - How To Sew Quilt Blocks With Partial Seams - https://www.abrightcorner.com/

Sept. 22 - Lisa Ruble - Curved Piecing Doesn't Have To Be Scary (Or Perfect!) - https://www.quiltyzest.com

Sept. 23 - Sarah Goer Quilts (you're here!) - Tips for Piecing Precise Points - https://sarahgoerquilts.com

Sept. 24 - Faith and Fabric - Spinning Intersections On Four Patch Blocks - The Easy Way! - https://faithandfabricdesign.com

Sept. 25 - Judit Hajdu - Draw String Bag - For Lunch Or Gym - https://www.quiltfox-design.com

Sept. 26 - Sugar Sand Quilt Co. - The Care And Feeding Of The Wild Longarm Quilter - https://sugarsandquilts.com/

Sept. 27 - Hilary Jordan - Quick & Easy Pattern Matching Technique for Quilt Backings - https://byhilaryjordan.com/

Sept. 28 - True Blue Quilts - Sketch Then Stitch...Better FMQ Through Doodling - https://truebluequilts.com

Sept. 29 - Sunflower Quilting - A Quilting Tip - https://sunflowerstitcheries.com

Sept. 30 - Slightly Biased Quilts - Perfect Hand Binding Tips - www.slightlybiasedquilts.com


Hello quilty folks! Today kicks off the Back to School Blog Hop for 2022, hosted by Bobbie Gentili of Geeky Bobbin. Please bookmark this page to visit each of the 16 daily stops on this year's blog hop. So many great tips and tutorials are coming your way!

Be sure to visit every stop on the hop!

Sept. 15 - Geeky Bobbin - Press for Success! - https://geekybobbin.com

Sept. 16 - Katie Mae Quilts - Storage Solutions From The School Supplies Section - https://katiemaequilts.com/blog

Sept. 17 - Quilting Jetgirl - Make A Design Wall You Can Use Your Hera Marker Against - https://quiltingjetgirl.com/

Sept. 18 - Karen Bolan - How to Get Perfect Tension - https://www.karenbolan.com

Sept. 19 - Devoted Quilter - How To Trim HSTs Without A Specialty Ruler - https://www.devotedquilter.com

Sept. 20 - Sarah Ruiz - Calculating Quilt Backing and Binding Fabric Requirements - https://saroy.net

Sept. 21 - Andy Knowlton - How To Sew Quilt Blocks With Partial Seams - https://www.abrightcorner.com/

Sept. 22 - Lisa Ruble - Curved Piecing Doesn't Have To Be Scary (Or Perfect!) - https://www.quiltyzest.com

Sept. 23 - Sarah Goer Quilts - Tips for Piecing Precise Points - https://sarahgoerquilts.com

Sept. 24 - Faith and Fabric - Spinning Intersections On Four Patch Blocks - The Easy Way! - https://faithandfabricdesign.com

Sept. 25 - Judit Hajdu - Draw String Bag - For Lunch Or Gym - https://www.quiltfox-design.com

Sept. 26 - Sugar Sand Quilt Co. - The Care And Feeding Of The Wild Longarm Quilter - https://sugarsandquilts.com/

Sept. 27 - Hilary Jordan - Quick & Easy Pattern Matching Technique for Quilt Backings - https://byhilaryjordan.com/

Sept. 28 - True Blue Quilts - Sketch Then Stitch...Better FMQ Through Doodling - https://truebluequilts.com

Sept. 29 - Sunflower Quilting - A Quilting Tip - https://sunflowerstitcheries.com

Sept. 30 - Slightly Biased Quilts - Perfect Hand Binding Tips - www.slightlybiasedquilts.com

Welcome to my stop on Tutorial Week with Finish-a-Long. I'm sharing my process for using scraps to create pumpkin blocks.


Grab your orange (or yellow or white or whatever color you want your pumpkins to be) scraps. Depending on the size of your scraps and the size of your desired pumpkins you can use your scraps as is (which I've done with my single fabric pumpkins) or you can piece together your smaller scraps to form a scrappy slab (as shown in the large pumpkin) before constructing your pumpkin. You'll also want fabric for a stem and a contrasting background fabric.

Pumpkins come in a variety of sizes and shapes. Cut the largest rectangle (can be square or not) from your orange fabric.

Background is attached to the pumpkin by adding snowball corners to each corner. To determine the size of these background triangles I recommend cutting squares that are 1/5 to 1/3 the length of your pumpkin's shortest side. Make these calculations using finished dimensions. For example, for my 5" x 6" orange rectangle, subtract 1/2" in each dimension for finished size: 4 1/2" x 5 1/2". Next, calculate 1/3, 1/4, or 1/5 of the shortest length, in this case 4 1/2".

1/3 of 4 1/2" (4.5 divided by 3) is 1.5" or 1 1/2"

1/4 of 4 1/2" (4.5 divided by 4) is 1.125" or 1 1/8"

1/5 of 4 1/2" (4.5 divided by 5) is 0.9"

There isn't anything super precise about the choice you make here. The range of these calculations in this example is roughly 1" to 1 1/2". You can round to the nearest 1/4" for friendlier measurements. Then add 1/2" to your choice to get the dimensions of the unfinished square. Cut 4 squares in these dimensions. I used 1" finished (since it is between 0.9 and 1.125), so I cut four 1 1/2" squares for my corners on this pumpkin.

Use your preferred marking tool to mark the diagonal on the back of each of your four background squares, align pumpkin and background fabrics right sides together and sew on the marked diagonal line.

Trim 1/4" from stitching line and press open. (Tip: if you are working with larger pieces, you can sew a second line of stitching 1/2" from the first so that the remnant you trim off is a finished HST as shown in this previous tutorial.)

The simplest stem option is to include a rectangle of brown fabric on the top edge of the pumpkin. (You can experiment with different shaped stems and even add leaves!) For my stems I cut a brown rectangle the same width as the background square above and 1/2" taller. In this case I cut a 1 1/2" x 2" brown rectangle and two 2" strips of background each approximately half the width of the pumpkin. Piece the strip with two background pieces and one stem piece, trim to same width as pumpkin, and attach. You can center the stem on the pumpkin by folding each part to find the centers and align to attach the stem. I just eyeballed it since in nature the stems aren't necessarily perfectly centered.

Add background fabric to bring up to your desired block or mini quilt size.

Here's a glimpse of all the pieces (except for background strips).


Bet ya can't make just one!

This mini pumpkin is made from a 2" x 2 1/2" scrap of orange fabric, with 1 3/8" corner squares. The stem is 1 3/8" x 1 7/8".


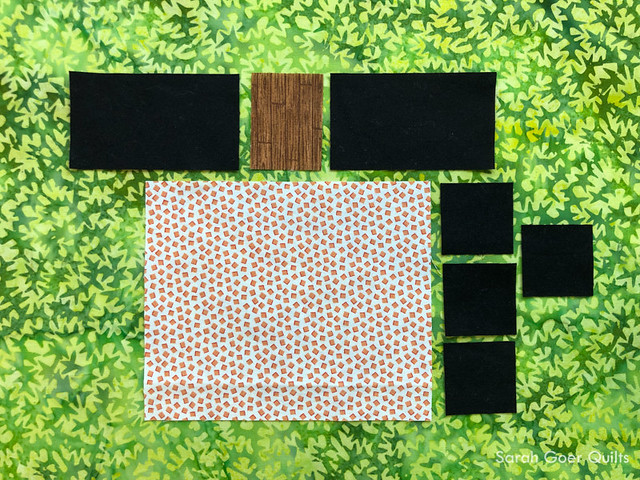
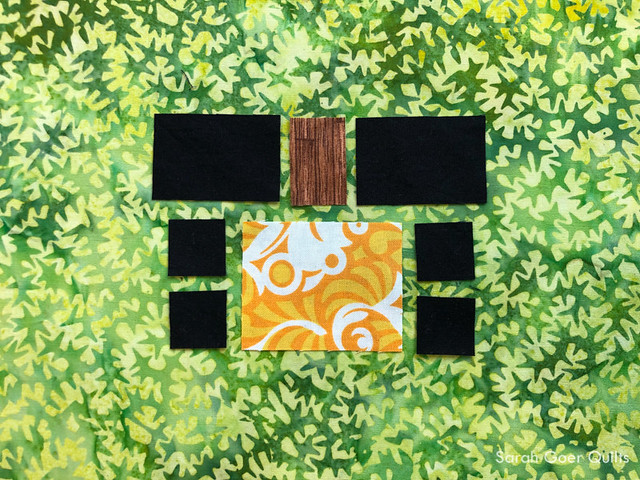
This Scrappy Slab version is made from a 6 3/4" x 7 3/4" scrap of orange fabric, with 1 3/4" corner squares. The stem is 1 3/4" x 2 1/4". You can find all my tips for making your own Scrappy Slab in my on-demand class.

Happy Sewing!